
Their Majesties asked me to make a prize box for the Regalia Challenge held at Magna Faire. Since I didn’t know who was getting it, I needed to make it somewhat generic. I fell back to chip carving because I’ve not gotten a lot of practice with it recently. It was a fun project with a much bolder pattern than I have done in the past. As you’ll see below, no project is perfect and I had to make a few corrections.
The carcass of the box is pretty standard for my construction at this point. It’s held together with dovetails. The bottom 0.25″ of the sides are left full length and mitered to conceal the grove in which the bottom is held.

The top was then laid out. This was a series of overlapping circles. I removed the ovals to create a concave diamond pattern. I added a plunge cut star to add visual interest.


Now for the “Ooops!” section of this blog. First, occasionally a knife it going to split or a some unseen treaterous wood grain is going to cause a piece to break out of the piece of the board left alone. If you can find and save the piece, you can glue it back in. Use blue tape to hold it in place while the glue sets. (Below you can see the tape residue where I’ve glued a chunk back in. You can remove this with a card scrapper)

The second oops on this project was caused by not paying attention when I got going. The layout of this piece was going to be a ‘rug’ in the center of the top with 1.5″ margin of un-carved wood. You can see the carving which extends past the border (highlighted in red below).

If I continued the ‘column’ I started accidentally and mirrored it on the other side, the margin would be only 0.75″ on the left and right, while the top and bottom would have a 1.5″ margin. I had long lost the ‘chip’ before I realized the error, so gluing it back in was out of the question. If I added new ‘rows’ to the top and bottom, the margin would be 1″.
Since I had no choice, I added the columns and then considered the piece. With the top being square, the rectangular ‘rug’ looked ill-proportioned. After completing the extra rows, I found the 0.25″ difference in margins much less jarring.
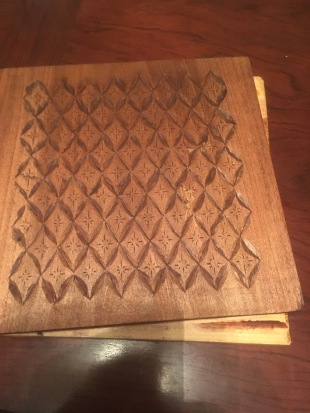
In the picture above you can see the third Ooops! I was not careful enough with the glue, and it caused light spots when the stain was added. I later used a chisel to remove some material and reapplied stain, but even in the finished product you can see the light spots.
There is one additional design feature on this box. The lid started as a 0.75″ thick board. Under normal circumstances, I would have resawn and planned down the board to approximately 0.375″. I have found that sometimes this can leave the board vulnerable to cupping. In stead of thinning the whole board, I thinned only the perimeter, leaving the center at full thickness.
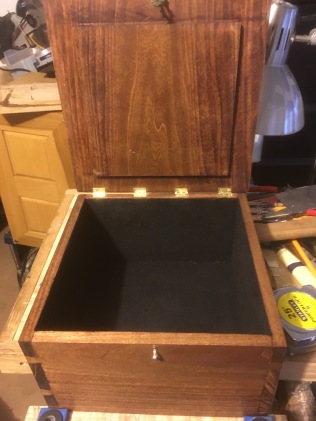
You can also see that I chose to use four small hinges to share the load of the lid. I did not want the fasteners to punch through the top of the lid.


